Exporting data over API with Confirmed tab
When designing a stable and robust integration workflow, you may have been considering more possibilities for integrating Rossum over API with your ERP system. There are more ways to do it with Rossum. In this article, we are introducing an option that proved very effective for many users regarding integration reliability and ease while keeping the workflow friendly to manual operators. This option includes the usage of the Confirmed tab to allow the users to correct mistakes made during manual review and the robots go through confirmed documents before exporting them to the ERP.
The article will include Postman examples of API requests. You can read more about using Postman here.
The Scenario
The scenario introduced in this article is where you want to download the extracted data from Rossum and validate it against your ERP system. If the data were validated correctly, you would finish the workflow by moving such data to the exported state. If there were some validation errors, you would give the human operator the option to review the document again.
Some ERP/AP systems perform validation checks before storing the data. If such a check fails, you might want to tell the operators to look at the document once again within Rossum and correct the existing issues. Therefore, informing users about the failed exports would be very useful.
From Rossum's current experience, the best solution for achieving such a workflow would be to:
- Download the documents from the Confirmed tab.
- Try to export the documents to the ERP/AP system.
- Move the successfully exported documents to the Exported state.
- Keep the unsuccessfully exported documents in the confirmed state or switch them to the failed_export state, where the user will see a red error icon on the Exported tab.
The API calls needed for such workflow will be described in the sections below.
Step 1: Downloading data for confirmed documents
Firstly, you will need to download the data captured in the confirmed documents so you could try to export them the the EPR/AP system:
The API request would look like this:
- call the /v1/queues/<queue_id>/export
- use GET method
- select documents in the confirmed state (status=confirmed)
- choose the output file format (f.e. format=xml)
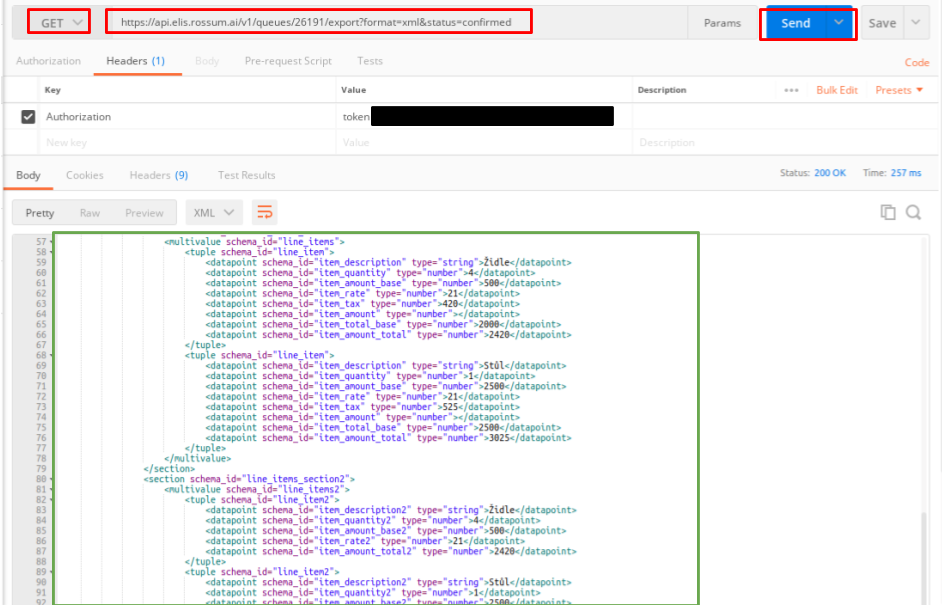
You would get the captured data in the response as you can see in the image above.
Step 2: Exporting data to the ERP/AP
Once you have the captured data, you can try to export them to the ERP/AP system. After the attempt to store the data, the system should return the status of whether the data was successfully exported or not. You would move the documents in Rossum to the correct status based on such information.
Step 3: Move successfully exported documents to the Exported state
The successfully exported documents should be moved to the Exported tab in Rossum. To achieve this, the following request should be sent to the Rossum API:
- Call the /v1/queues/<queue_id>/export.
- Use the POST method.
- Select documents in the confirmed state ("status=confirmed").
- Choose the output file format (f.e. "format=xml").
- Move the documents workflow by moving such data to the exported state ("to_status=exported").
As an optimization, you could pass a set of document IDs to the request that should be exported within the single request. Passing the IDs as a parameter would ensure that only the documents which were validated by export checks will be moved to the Exported tab. Or you could export each document individually. However, this might be less efficient and would lead to an unnecessary API traffic load.
.png")
Do not PATCH the status of confirmed documents to "exported" stateAnother way how to move the documents to the "exported" state is to PATCH the status of the annotation, as done in Step 4. However, we highly recommend using the /export endpoint which ensures that the data corrections will be considered for updating the AI Engine capabilities.
Step 4: Marking documents as failed exports in Rossum
Some of the documents might not have been exported successfully to your ERP/AP system. In such a case, you should switch the state of the documents to the failed_export so the user can see that some documents were not processed correctly.
A request for switching the document to the failed_export would look like this:
- call the /v1/annotations/<annotation_id>
- use PATCH method
- include "status": "failed_export" in the JSON body

Afterwards, your users would see the document on the Exported tab marked with a red icon. By clicking on the circle-with-arrow icon the user could move the document back to the To Review tab.

An annotation with a failed_export status.
Updated 7 months ago