Using Postman with Rossum API
The Rossum API allows you to programmatically access and manage your Rossum organization's data and account information. One of the fastest ways to try the Rossum API is via the Postman tool.
In this tutorial, we'll lead you through the basic steps of testing and integrating the basic Rossum document workflow.
Login request
All requests to the Rossum API have to be authenticated. Perform actions below to log into the Rossum API:
- Create a new request by clicking on the "New" button in the top left corner.
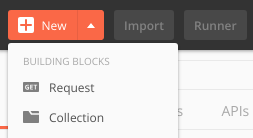
Creating a new request.
- Choose the POST method in the HTTP method dropdown.
- Paste
https://example.rossum.app/api/v1/auth/logininto the "Enter request URL" input. - Click the “Body” tab in the menu below.
- Select the “form-data” radio button.
- Write “username” into the “Key” field and your Rossum username into the “Value” field.
- Below, fill “password” into the “Key” field and your Rossum password into the “Value” field.
- Send the request by clicking the “Send” button.
For the inputs described in the preceding steps, see the red rectangles on the image below.
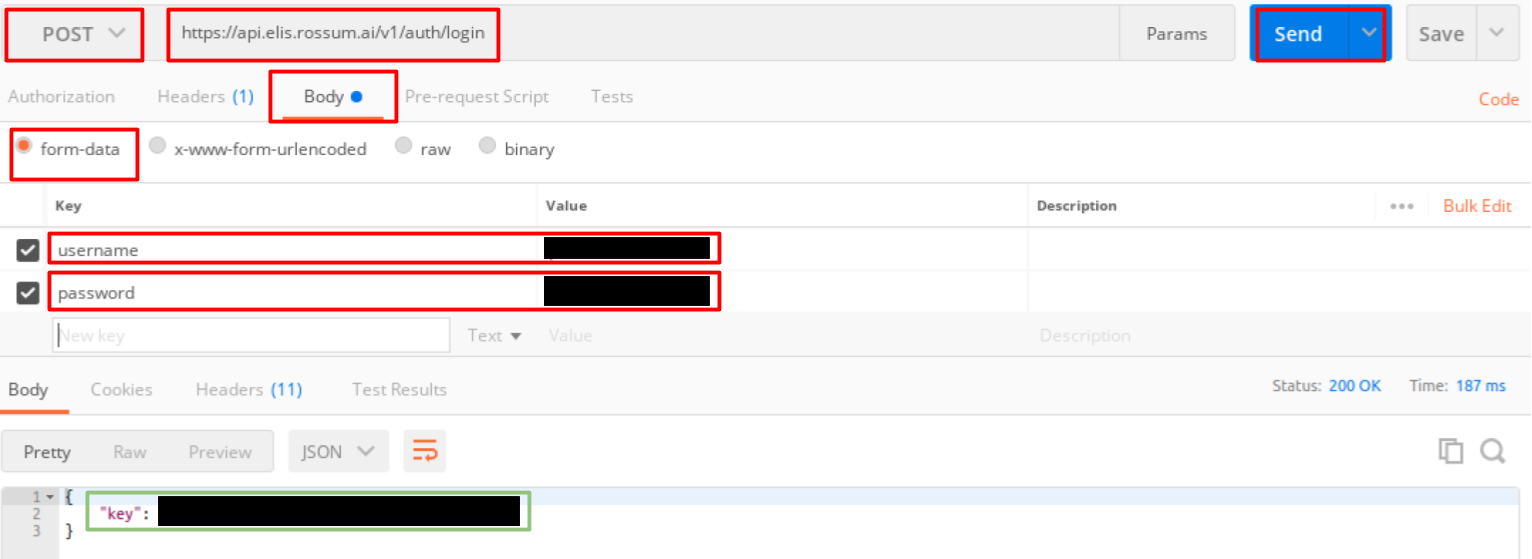
Login request.
After sending the request, you will receive an authentication token (green square on the image above) that can be used for authenticating other requests. This token key will be valid for a default expiration time (currently 162 hours) or until you log out from the session.
If you have issues when repeatedly logging in, please check this link.
Getting the Queue ID
In order to upload a document, you need the ID of the relevant queue. The easiest way to get the Queue ID is to copy it from the browser URL while having the Rossum app main screen opened on the selected queue.
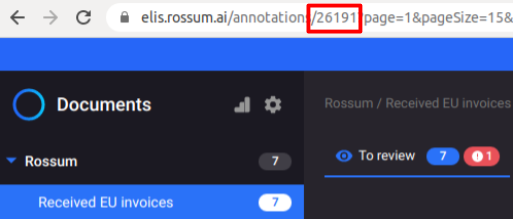
Getting Queue ID from Rossum web app.
However, the API can be used just as well to find out the Queue ID – you can get it by listing all available queues and their metadata. Get the URL of the relevant queue in response and use it in the subsequent calls.
- Choose the GET method in the HTTP method dropdown.
- Paste
https://example.rossum.app/api/v1/queues?page_size=1into the "Enter request URL" input. - Click the “Headers” tab in the menu below.
- Write the “Authorization” into the key-field
- Fill “token <authorization_token>” into the “Value” field where <authorization_token> is the authorization token retrieved in the previous step.
- Send the request by clicking the “Send” button.
Below, all the request inputs are highlighted with red rectangles on the image above, while the relevant Queue URL is framed by the light green rectangle in the response area under the key “url”.
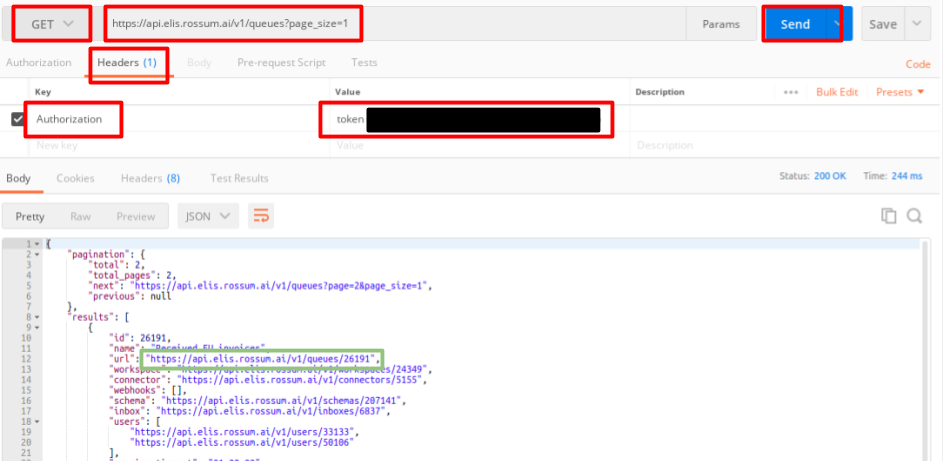
Getting Queue ID over API.
Uploading a document
Import the document by using the Queue ID from the results of the previous step.
- Choose the POST method in the HTTP method dropdown.
- Into the "Enter request URL" field paste the URL you obtained in the previous GET command and append ”/upload” at the end of the URL:
https://example.rossum.app/api/v1/queues/<queue_id>/upload. - Fill the authorization token as in the previous step
- Click on the “Body” tab in the menu and select the “form-data” radio button.
- Write the “content” into the key-field, choose “File” from the drop-down menu that appears at the end of the content-line, and upload a file containing an invoice into the “Value” field.
- Send the request by clicking the “Send” button.
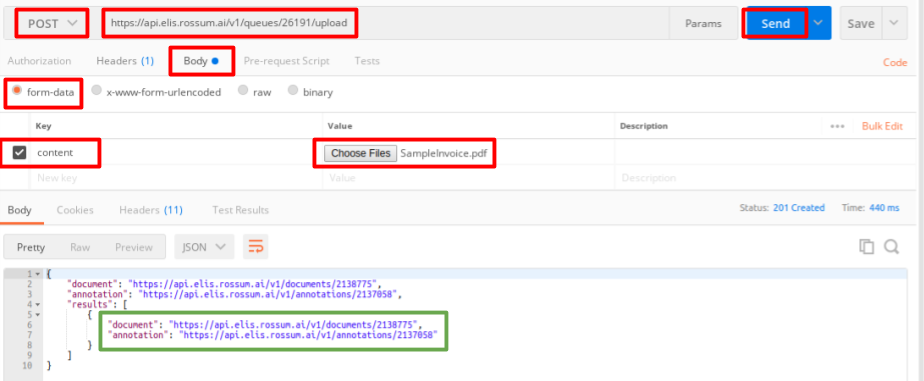
Upload request.
The response contains the ID of the uploaded document and its annotation ID within the Rossum system. Note the values under the “results” key. They could be used when further integrating Rossum.
Exporting the document in Rossum UI
Now, the uploaded documents are available in the Rossum application. Go to the Rossum main screen, open the annotation, review the fields and click “Confirm”.
Exporting the data
Retrieving the extracted data from Rossum is the goal of all integration processes. Export the extracted information from the reviewed documents in the form of f.e. JSON or XML file via GET command:
- Choose the GET method
- Into the "Enter request URL" field paste the URL
https://example.rossum.app/api/v1/queues/<queue_id>/export?status=exported&format=json- <queue_id> is the same queue_number as in the previous command. It is the ID at the end of the Queue URL
The request parameters within the URL can be seen in the “Params” tab of the request where you can double check them. More export parameters can be found in our API documentation.
- Fill the authorization token
- Send the request
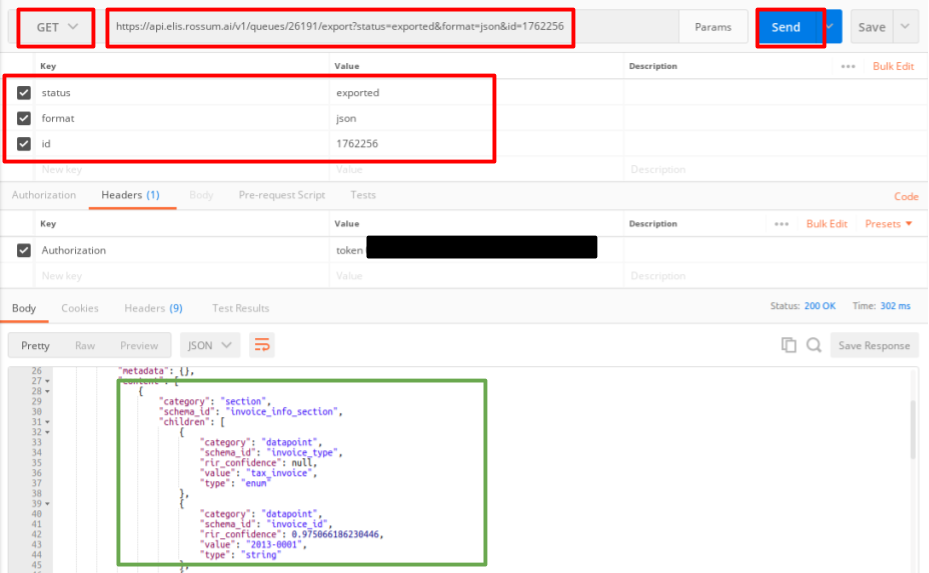
Export request.
You can see the extracted values within the JSON response.
Logout
In order to close the session, you can log out over the API. If you would not logout, the authorization token would expire within 162 hours.
- Choose the POST method
- Use the
https://example.rossum.app/api/v1/auth/logoutURL - Fill the authorization token
- Send the request

Note: If you try to log in with Postman after some time, you may receive an error response:

Troubleshooting failed login.
In such a case, cookies need to be erased. For erasing the cookies, click on the “Cookies” link below the “Save” button, and remove the “csrftoken” and “sessionid” values.
Next steps
Postman lets you explore the Rossum API and easily issue any requests you might need. This can include highly specialized functionality described in the Rossum API reference for which there are no official tools. However, if you are issuing just regular API calls related to the document flow or queue management, chances are that you will eventually want to transform this to actual program code. Thankfully, Postman makes that extremely easy for every request you issue with its Generate Code Snippets tool.
Besides the Rossum API reference, you can find more developer guides at the Developer Hub.
Updated 7 months ago